Deploying Game Of Active Directory On VMWare ESXI
Introduction to the GOAD Lab Setup
The Game of Active Directory (GOAD) lab is a purpose-built environment for Active Directory security testing. This guide walks you through setting up GOAD on VMware ESXi using an Ubuntu or Kali Linux host, helping to avoid common deployment issues.
A huge thank you to the team at Orange Cyberdefense for creating this incredible lab, which has become an essential tool for security professionals.
VMWare ESXi Spec (She’s old but a good work horse).
- Client version: 1.33.4
- ESXi version: 6.7.0
Prerequisites for the Ubuntu Host
To deploy GOAD efficiently, set up a dedicated Ubuntu/Kali host. All deployment actions will be executed from this machine.
Hardware Requirements
- Ensure Ubuntu/Kali HDD is 150GB - 200GB
Software Installation
Install Python and essential packages:
1
sudo apt install -y python3 python3-pip python3-venv
Install Ansible
1
 sudo apt install ansible
Install pywinrm for remote Windows management:
System packages should be fine for this dedicated host:
1
 sudo python3 -m pip install pywinrm --break-system-packages
Install Vagrant Ensure you install the latest version of Vagrant:
1
2
3
4
5
6
wget -O - https://apt.releases.hashicorp.com/gpg | sudo gpg --dearmor -o /usr/share/keyrings/hashicorp-archive-keyring.gpg

echo "deb [arch=$(dpkg --print-architecture) signed-by=/usr/share/keyrings/hashicorp-archive-keyring.gpg] https://apt.releases.hashicorp.com $(lsb_release -cs) main" | sudo tee /etc/apt/sources.list.d/hashicorp.list

sudo apt update
sudo apt install vagrant
Install Vagrant Plugins
1
2
3
4
5
6
7
vagrant plugin install vagrant-vmware-esxi
vagrant plugin install vagrant-reload
vagrant plugin install vagrant-vmware-desktop
vagrant plugin install vagrant-env
vagrant plugin install winrm
vagrant plugin install winrm-fs
vagrant plugin install winrm-elevated
Install VMware OVFTool
- Download from: https://developer.broadcom.com/tools/open-virtualization-format-ovf-tool/latest
- Copy to Ubuntu host using scp or WinSCP.
- Unzip and add OVFTool to path:
1
2
echo 'export PATH=$PATH:/home/vagrant/ovftool' >> ~/.bashrc
source ~/.bashrc
Clone the GOAD GitHub repository
1
git clone https://github.com/Orange-Cyberdefense/GOAD.git
Customising the GOAD Domain for Multiple Instances (Optional)
Note: This was a specific requirement that may not apply to most users. However, in the spirit of sharing knowledge and giving back, I’ve included it for anyone who might need to modify the GOAD lab to support multiple instances without conflicts.
In this walkthrough, I changed the top-level domain from .local to .h4x as part of this modification.
To prevent domain conflicts when running multiple instances, modify the top-level domain (TLD):
From the Goad root directory, locate occurrences of .local:
1
grep -r '\.local\>' .
Replace .local with .h4x (excluding false positives):
1
find . -type f ! -path "./goad/provisioner/ansible/vm.py" ! -path "./goad/provisioner/ansible/remote.py" ! -path "./goad/provisioner/provisioner_factory.py" -exec sed -i 's/\.local\>/\.h4x/g' {} +
Update directory context:
1
find . -type f -exec sed -i 's/DC=local/DC=h4x/g' {} +
That should be it. The TLD for the domain should be changed to whatever you specified.
Configuring ESXi Network for GOAD
Log in to the ESXi Web Interface
- Open a web browser and navigate to **https://
/ui**. - Enter your ESXi credentials and log in.
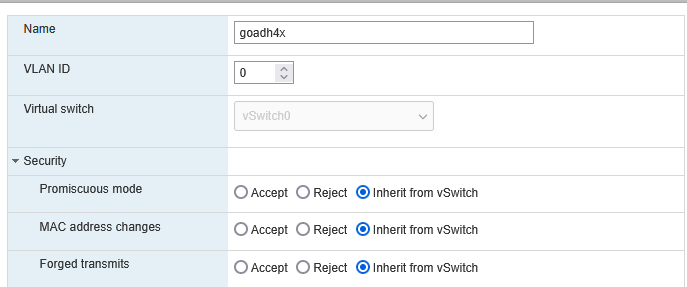
Create a New Port Group
Navigate to Networking > Port Groups > Add Port Group.

Assign a name and select the appropriate virtual switch.
Configure Ubuntu Network Adapter
- Shut down the Ubuntu host.
Add a second network adapter and connect it to the new port group.
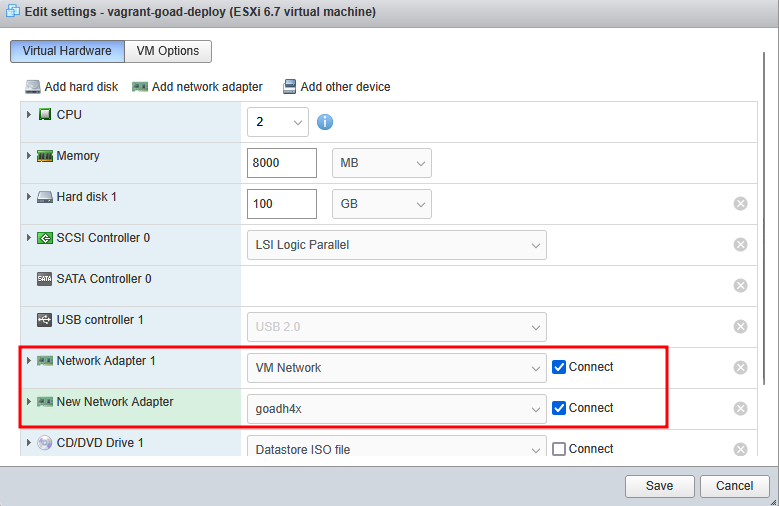
- Restart the Ubuntu host.
- Assign a static IP within the GOAD lab network range (without a gateway).
Running and Configuring GOAD
Running goad.sh
Navigate to the GOAD Git repository and execute the goad.sh script in the root of the GOAD directory:
1
./goad.sh
Upon execution, the GOAD management console will start, displaying the following banner:
1
2
3
4
5
6
7
8
9
10
11
12
13
14
   _____   _____          _____
  / ____| / ||| \   /\   |  __ \
 | |  __||  |||  | /  \  | |  | |
 | | |_ ||  |||  |/ /\ \ | |  | |
 | |__| ||  |||  / /__\ \| |__| |
  \_____| \_|||_/________\_____/
    Game Of Active Directory
      Pwning is coming

Goad management console type help or ? to list commands

[*] Start Loading default instance
[*] lab instances :
[-] No instance found, change your config and use install to create a lab instance
Using goad.sh Commands
Once inside the goad.sh environment, type help for a list of available commands:
1
help
Available Commands: Lab Instances
1
2
3
4
5
check – Check dependencies before creation
install / create – Install the selected lab and create a lab instance
create_empty – Prepare a lab instance folder without provisioning
list – List lab instances
load <instance_id> – Load a lab instance
Configuration
1
2
3
4
5
6
config – Show current configuration
labs – Show all labs and available providers
set_lab <lab> – Set the lab to use
set_provider <provider> – Set the provider to use
set_provisioning_method <method> – Set the provisioning method
set_ip_range <range> – Set the first three octets of the IP to use (e.g., 192.168.56)
Viewing and Editing the Configuration
Typing config inside the goad.sh environment displays the current GOAD configuration. In this case, we are interested in the vmware_esxi provider.
To manually edit the configuration, modify the /home/vagrant/.goad/goad.ini file:
1
2
3
4
5
6
7
8
9
10
11
12
13
14
15
16
17
18
19
20
21
22
GOAD/vmware/local/192.168.56.X > config
[+] Current Settings :
[*] Current Lab         : GOAD
[*] Current Provider    : vmware
[*] Current Provisioner : local
[*] Current IP range    : 192.168.56.X
[*] Extension(s)        :

[+] Configuration File content : /home/vagrant/.goad/goad.ini
[default]
 lab : GOAD
 provider : vmware
 provisioner : local
 ip_range : 192.168.56

[vmware_esxi]
 esxi_hostname : 10.10.10.10
 esxi_username : root
 esxi_password : ACrazySecurePassword
 esxi_net_nat : VM Network
 esxi_net_domain : GOAD-LAN
 esxi_datastore : datastore1
Modifying the Configuration for ESXi
Edit the goad.ini file to update the ESXi host, IP range, and provider:
1
2
provider = vmware_esxi
ip_range = 192.168.90  # Adjust this based on your network setup
This ensures GOAD deploys correctly to the specified ESXi host.
Updating Provider and IP Range in goad.sh
To apply the provider and IP range settings inside the goad.sh environment:
1
2
GOAD/vmware/local/192.168.90.X > set_provider vmware_esxi
GOAD/vmware_esxi/local/192.168.90.X > set_ip_range 192.168.90
This ensures the correct provider and IP range settings are applied during deployment.
Fixing the dotenv.rb Error
If running the install command results in the following error:
1
2
3
Path: /home/vagrant/.vagrant.d/gems/3.3.6/gems/dotenv-0.11.1/lib/dotenv.rb
Line number: 0
Message: undefined method `exists?'
Run the following command to fix the issue by replacing exists? with exist?:
Note: Change your path accordingly.
1
sudo sed -i -e 's/exists?/exist?/g' /home/vagrant/.vagrant.d/gems/3.3.6/gems/dotenv-0.11.1/lib/dotenv.rb
Once the fix is applied, rerun the install command inside the goad.sh environment:
1
GOAD/vmware_esxi/local/192.168.90.X > install
Everything should now be correctly configured, and the GOAD lab instance should deploy without conflicts.
Issues Encountered While Setup.
Note: It’s likely the TLD of the domain will be .local and not .h4x in your deployment. Troubleshot accordingly.
Issue 1 - DC2 Child Domain Promotion
I encountered an issue where DC2 would not promote to a DC. I Got around this by the following.
Manually Install DNS Service:
1
Install-WindowsFeature -Name DNS -IncludeManagementTools
Manually Change Listenaddresses:
1
dnscmd . /resetlistenaddresses 192.168.90.11
Set ADWS Start to Automatic:
1
2
Set-Service -Name ADWS -StartupType Automatic
Start-Service ADWS
Set GOAD Network Interface Priority Over NAT Interface
1
2
powershellGet-NetIPInterface | Sort-Object -Property InterfaceMetric
Set-NetIPInterface -InterfaceAlias "Ethernet1" -InterfaceMetric 3
Check DNS Resolving
1
nslookup sevenkingdoms.h4x
Test Connection to DC
1
Test-NetConnection -ComputerName kingslanding -Port 389
Test DC Querying
1
nltest /dsgetdc:sevenkingdoms.h4x
Disabled IPv6 on GOAD network card - If nslookup returns error
1
Disable-NetAdapterBinding -Name "Ethernet1" -ComponentID ms_tcpip6
Disable network card not associated with GOAD (Ethernet0)
Manually Promoted the DC2 as Domain controller of child domain. (Get Domain Creds from /GOAD/ad/GOAD/data/config.json) 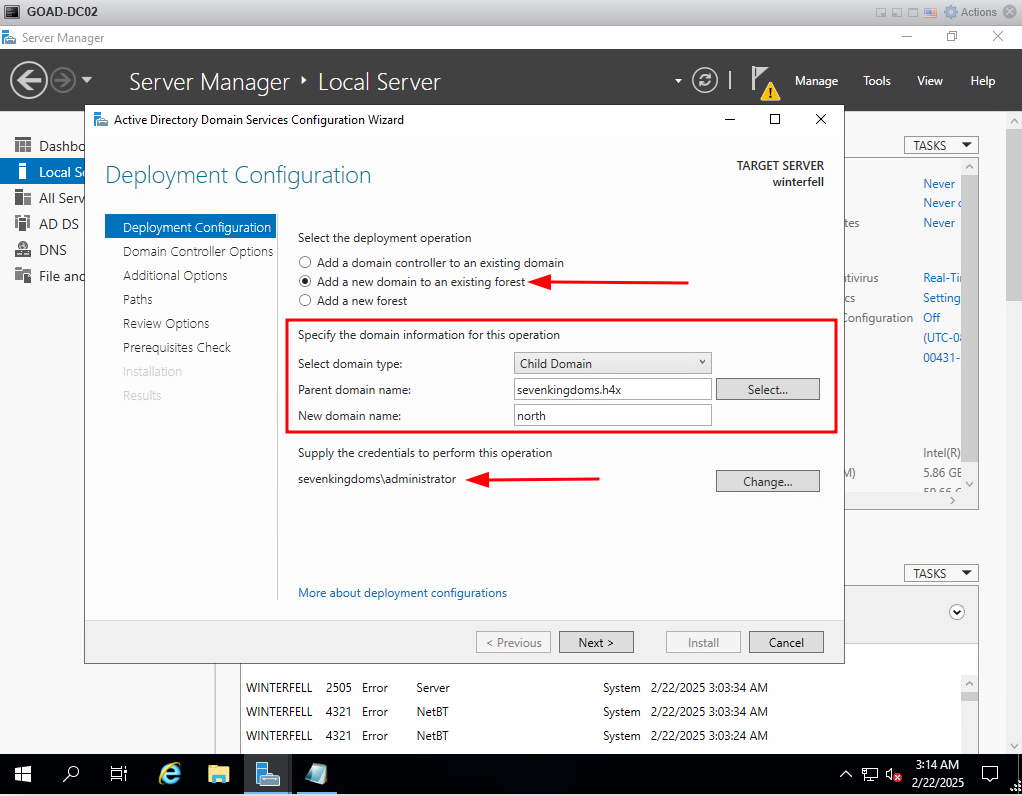
Issue 2 - MSSQL
During the SQL Database creation, there were errors. I followed some advice online, and uninstalled anything related to MS SQL and reboot the server. Rerun of script installed correctly.
Deploying the Exchange Extension on VMware ESXi
At the time of writing, the GOAD repository did not include the necessary directory structure and files required to deploy extensions on ESXi out of the box. Fortunately, this is an easy fix.
We will deploy the Exchange extension against a VMware ESXi infrastructure.
Step 1: Create the Required Directory
First, create a vmware_esxi directory inside the /GOAD/extensions/exchange/providers/ directory:
1
mkdir -p ~/GOAD/extensions/exchange/providers/vmware_esxi
Step 2: Copy the Vagrant File
Once the vmware_esxi directory has been created, copy the Vagrantfile from the existing VMware provider directory:
1
cp ~/GOAD/extensions/exchange/providers/vmware/Vagrantfile ~/GOAD/extensions/exchange/providers/vmware_esxi/
After copying, verify the contents of the new directory:
1
2
~/GOAD/extensions/exchange/providers/vmware_esxi$ ls
Vagrantfile
Step 3: Review the Vagrantfile
The Exchange extension Vagrantfile should contain the following configuration:
1
2
3
4
5
6
7
8
9
boxes.append(
  { :name => "-SRV01",
    :ip => ".21",
    :box => "StefanScherer/windows_2019",
    :os => "windows",
    :cpus => 4,
    :mem => 12000
  }
)
This defines a Windows Server 2019 instance with 4 CPUs and 12GB RAM, assigned an IP address within the GOAD lab range.
Step 4: Execute goad.sh and List Extensions
Now, execute the goad.sh script to enter the GOAD management environment:
1
2
cd ~/GOAD
./goad.sh
Once inside the GOAD environment, list the available extensions by running:
1
GOAD/vmware_esxi/local/10.10.140.X > list_extensions
This will output a list of extensions:
1
2
3
4
[*] exchange...................... Add an Exchange server to GOAD lab
[*] wazuh......................... Add the Wazuh EDR into the lab
[*] elk........................... Add an ELK stack to the lab
[*] ws01.......................... Add a hardened workstation to the lab
Step 5: Install the Exchange Extension
To deploy the Exchange Server within the GOAD lab, run:
1
GOAD/vmware_esxi/local/10.10.140.X > install_extension exchange
After some time, the Exchange Server should be fully operational and domain-joined.
Step 6: Deploy Additional Extensions
Follow the same methodology to deploy other extensions such as:
1
2
3
Wazuh (EDR solution)
ELK (Logging & analytics stack)
WS01 (Hardened workstation)
And that’s it! Your Exchange Server is now deployed within the GOAD lab on VMware ESXi.